
So I LOVE pottery barn and I have seen this bed on there many times! I think it is so beautiful BUT I HATE the price tag!! I just can not see myself spending $2,000 on a bed! So I decided I could make it myself.

I did a little research and found a bed on ana-white.com (http://ana-white.com/2012/04/plans/chestwick-upholstered-headboard-queen) that I liked. Now her plan is for a queen bed and I have a king so I measured my bed frame and went off of that! Her plan also didnt have the little middle piece of wood that I wanted so I went ahead and added that on my own. I did a little tweaking but the plans worked perfectly and I was super happy with the end result.....
BTW I was so excited that the girls from http://mybest-friendsblog.blogspot.com/ came and helped me! We had such a fun time making the headboard, I think we will be making a couple more in the near future! Thanks for all your help Girls!!
.JPG)
.JPG)
ok Let me explain how I did this....
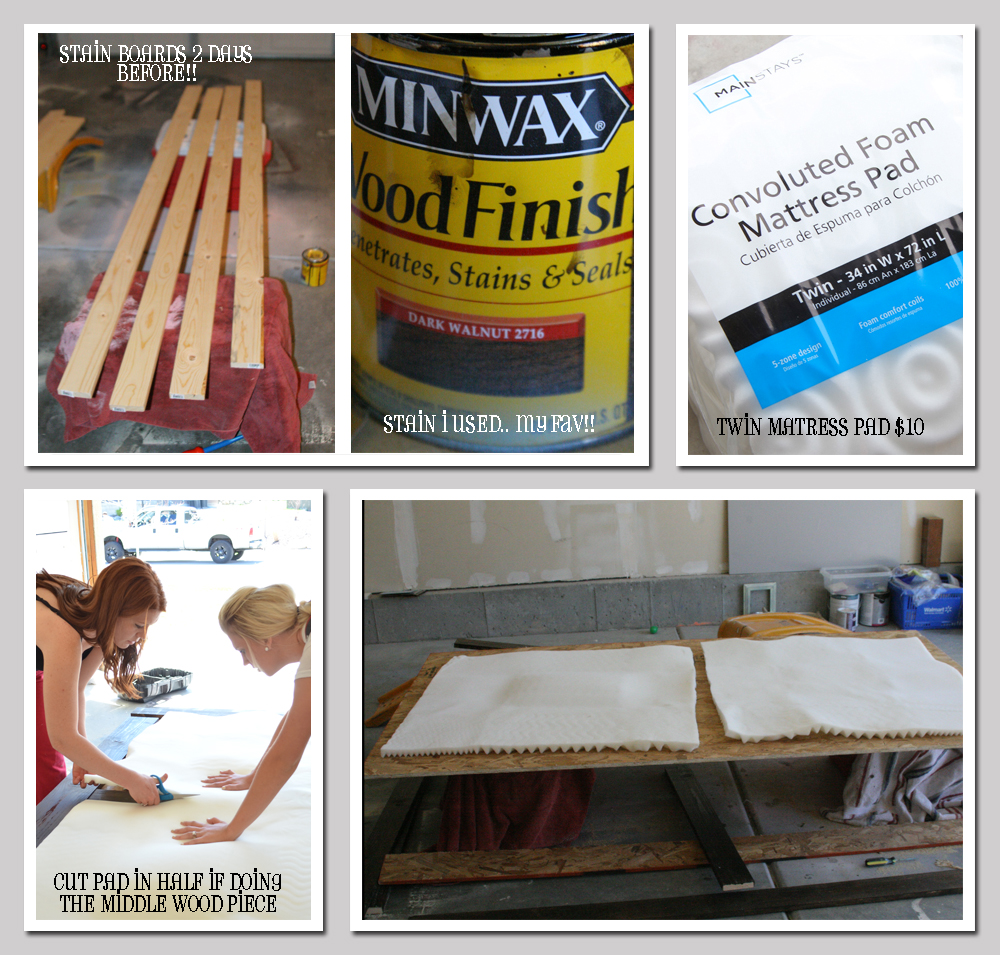
For the boards I bought pine. Had Mr. this and that cut to size (use ana's plans http://ana-white.com/2012/04/plans/chestwick-upholstered-headboard-queen or measure your bed frame and choose your height) Make sure you stain pine boards ahead of time. I did mine the night before and they were still a little wet sticky, so I would suggest doing them 2 days before.
The board I used ply wood. You can use MDF as well plywood was just cheaper.. Had the hubs cut to size. (again measure your bed frame or follow ana's plans)
For my padding for the headboard I used this mattress topper I got from Waly world (wal-mart) which was $10 CHEAP!! also got the batting their for $13.
you can use any kind of lined for the headboard, I just had an extra gray curtain laying around that would do the job and it cost me Zilch, nada, $0.......NOTHING!!!
Step BY Step (picture above)
1. Stain boards
2.place matress pad on plywood (or MDF)
3 (optional) cut pad in half. (for the additional wood piece in the middle)
4. staple and secure matress pad to plywood (or MDF)
(P.s. dont mind my PJ's, I hadnt brushed my hair, or applied any makeup oh and I apologize about my messy garage!! LOL)

(picture above)
5. Cut batting to have each side hanging of board by about an inch
6. staple/attach batting on the back side
7. staple/attach linen of choice (mine needed to be ironed so badly) to the board as seen in last box on picture above.

(Picture above)
8. Nail the plywood pieces onto the board
FYI: I attached 2x4 pieces on the back one across the top one across the bottom and two on each side. Not only did it made it sturdy but i also could attach my bed frame to it. (see below)

TADA!!!
I am so dang happy with it!! it really only cost me about $75 after all said and done.


I am so happy with it!!! I feel like it looks like $2,000 but I only spent $75. If you have any questions please feel free to contact me! Thanks for stopping by! XOXO
Soo cool! This needs to go on pintrest!
ReplyDeleteThank you!!! I will post it!!
DeleteI love this! I pinned it...I hope you don't mind? I really like your bedding set too...LOVE the gray and yellow. Where did you get it? (Or what fabric if you made it?)
ReplyDeleteHey Jaclyn. I don't mind that you pinned that at all, in fact I appreciate very much. Thank you!! I got the bedspread from target but I made the pillows (other than the 2 that matches the bedspread ) its a reversible quilt/bedspread and I absolutely love it, it makes me happy with the bright yellow :) thanks for stopping by! Xoxo
DeleteWow, now that is cool! I like it better than pottery Barns! I'm pinning too! and I'm now a follower
ReplyDeleteThank you Lorrie!! I am so excited to have you as a follower! xoxo
DeleteI saw this over at My Best Friends Blog and was blown away! It is gorgeous!! Great job :)
ReplyDeleteThank you so much!!
DeleteYou did an amazing job. The bed is gorgeous.
ReplyDeleteThank you Michele!!
DeleteI adore this bed and all of your fabrics! I have been wanting a headboard change, and I think I just found it! Pinning, and then featuring at my next Show & Tell party - thanks for linking up!!
ReplyDeleteSeriously it really was not hard! You will have to post pictures if you do one! Thanks so so much for featuring it Tisha! xoxo
DeleteGreat job, that looks awesome! I would love for you to share this (and any other house projects) at my "May House Par-tay" at www.cheapcraftymama.com!
ReplyDeleteThank you! I will head on over now!!
DeleteGreat work!
ReplyDeleteThank you!!
DeleteYou rock girl, that looks better than the pb one.
ReplyDeleteAw thank yo so much!
DeleteWow! You did such an awesome job!! I was shocked at the last pictures. It looks soooo cute!!
ReplyDeleteThanks Sarah!! Still LOVING your blog!! xoxoxo
DeleteWow, your headboard turned out great!! I have this linked to my headboards post too today, well done!
ReplyDeleteGreat job! Would you mind sharing where you got the curtains? I love the colors and patterns!
ReplyDeleteOf coarse not. I actually bought 2 square table clothes at target and used them as curtains! WAY cheaper and SOO cute!
DeleteLooks really cool! And what I love most is the placement of your bed...ours is under a window as well, but we currently have no headboard and no curtains--I love seeing that it can work!
ReplyDeleteI'm loving this! I have a similar dilemma but with the headboard we currently have. I was thinking about covering the ugly part with batting and fabric, but needed some ideas! So, I pinned you and plan on using you as a reference when figuring out mine! Thanks so much! I'll be sure to link back when I finally get it done (and blogged about!).
ReplyDeleteShara @ Palmettos and Pigtails
Yes make sure you share pictures! I would love to see how it turns out!! Good luck! xo
DeleteThis looks great!! I'm currently debating what to do about a new headboard. I'm seriously tired of what I have!
ReplyDeleteI love it! Also I have been looking for fabric ljust like at for curtains!! Where did you get it?
ReplyDeleteWhat kind of bed frame do you have? I'm looking to attach this to a king size metal Bedframe and would like some tips on how you did it! Thanks!
ReplyDelete