Friday, May 4, 2012

Indoor herb garden

 I don't know about you but I get so excited when I have FRESH herbs at my fingertips. I love having an indoor herb garden and I thought I would share with you how to make one! It is VERY inexpensive. 
BTW It would make an amazing mothers day gift or a birthday gift! Here we go....
1. I had some extra wood pieces laying around from another project I did so, I used
  • 1x4 (for the long sides) and cut 2 long pieces like over 1 foot (not exactly sure, but cut to whatever size you want.) 
  • 1x4 (short sides) cut 6 inches long
  • 1-1x6  (for the bottom) cut the same as the 2 long pieces.
(check out step 6 in the picture, hopefully the sizes will make more sense)
2. paint the color of choice
3. while paint is drying move onto your glass jars (which I got from the dollar store..SCORE!!)
4/5. cut your burlap into 3 to 4 inch strips and hot glue gun the ends of the burlap onto the glass add twine if you want (I did its way cute, wrapped it around the burlap 3 times, as seen in last picture) 
6. After paint is dry you can glue pieces together with gorilla glue or any tough glue OR you can use a brad nailor to get the job done which is what I did (sorry no picture of me in the action) :)
7. after paint is dry let distress it and make it look PuRdy!!
8. add a handle or knobs if you want and.... SO RUSTIC!! LOVE IT!!

now for the herbs:

1. Buy the potting soil (got mine at walmart for around $5) and herbs (about $3.50 a piece)
2. place rocks at the bottom of the jar for soaking the soil if I accidentally overwatered, especially because it has no draining holes.
3. place all your herbs in the little homemade box
4. I cut out tiny pieces of paper and wrote what herb it was and then glued it to a Popsicle stick, just to give it a little something extra!


Hope you enjoyed this post! SHARE THE LOVE!!! xoxo

Modge podge picture block

2x4 DIY picture Block
Ah I love this project! I have done a couple of the "DIY picture block" decor (that's what I am calling it, HA) They are all around my house. Last year for mothers day I had made one with my Mom and I and now I did this one of my brother and my mom, SO PRECIOUS right?  anyways lets get down to it..... yeah?


 1. Cut any extra piece of wood you have to any size. I had a 2x4 piece of wood that I used (cut it to whatever size you want, really depends on picture) 
2. paint your board any color you want. (I stained/glazed mine after I painted, which is optional.) at this point cut out your picture and paper to fit your block.
(*FYI if picture is printed at home the modge podge with smear the photo ink)
3. modge podge the wood where your paper and picture will be going, set them on top of modge podge and then modge podge directly on top of the photo and paper. (whew that was a lot of modge podge!)
 4. after it is COMPLETELY dry, you might notice the sides of the picture and paper hanging over. I take a nail file (or sandpaper, your choice) and sand the edges so it looks as if the photo and paper were printed on the wood block!
Last but not least add a couple fun touches like twine, buttons, quotes. Whatever you would like!
I had the ladies from http://mybest-friendsblog.blogspot.com/ over so I could share this fun gift idea!
its great for mothers day!!
Thanks so much for stopping by!

Tuesday, May 1, 2012

Date night!!

I don't know about you, but the Mr. And I do not get out as much as we would like. We had a fun little date night on Saturday. Sushi, friends and quality time!!! Perfect way to
Spend my Saturday!! Don't you love our new look. Ha ha anyways love my hubs and I can't wait for the next date night!!

Sponsor LOVE

Meet Aubrey. She is my first sponsor!! YIPPEE. Inst she just beautiful. I am excited to follow her on her blog she is so sweet! Thanks a bunch Aubrey!!

Monday, April 30, 2012

DIY headboard


So I LOVE pottery barn and I have seen this bed on there many times! I think it is so beautiful BUT I HATE the price tag!! I just can not see myself spending $2,000 on a bed! So I decided I could make it myself. 

I did a little research and found a bed on ana-white.com (http://ana-white.com/2012/04/plans/chestwick-upholstered-headboard-queen) that I liked. Now her plan is for a queen bed and I have a king so I measured my bed frame and went off of that! Her plan also didnt have the little middle piece of wood that I wanted so I went ahead and added that on my own. I did a little tweaking but the plans worked perfectly and I was super happy with the end result.....
BTW I was so excited that the girls from http://mybest-friendsblog.blogspot.com/ came and helped me! We had such a fun time making the headboard, I think we will be making a couple more in the near future! Thanks for all your help Girls!!

ok Let me explain how I did this....


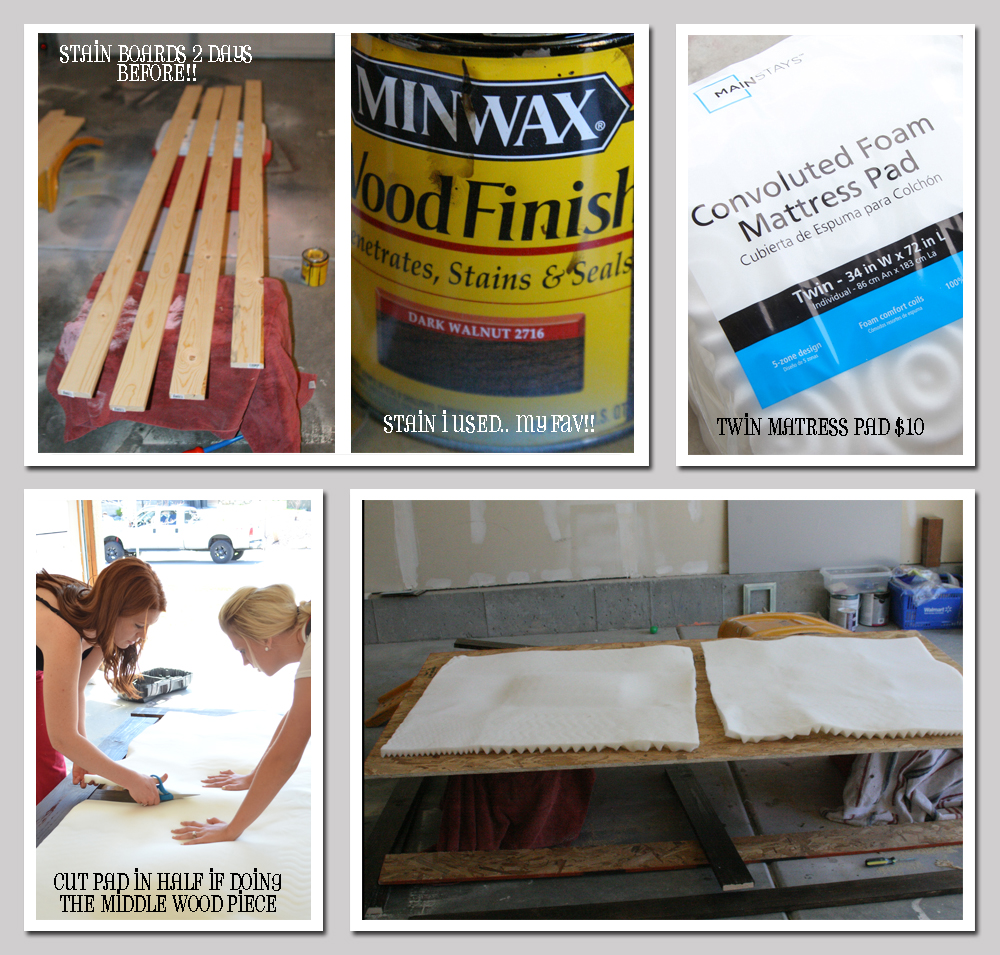
For the boards I bought pine. Had Mr. this and that cut to size (use ana's plans http://ana-white.com/2012/04/plans/chestwick-upholstered-headboard-queen or measure your bed frame and choose your height) Make sure you stain pine boards ahead of time. I did mine the night before and they were still a little wet sticky, so I would suggest doing them 2 days before.
The board I used ply wood. You can use MDF as well plywood was just cheaper.. Had the hubs cut to size. (again measure your bed frame or follow ana's plans)
For my padding for the headboard I used this mattress topper I got from Waly world (wal-mart) which was $10 CHEAP!! also got the batting their for $13.
you can use any kind of lined for the headboard, I just had an extra gray curtain laying around that would do the job and it cost me Zilch, nada, $0.......NOTHING!!! 
Step BY Step (picture above)
1. Stain boards
2.place matress pad on plywood (or MDF)
3 (optional) cut pad in half. (for the additional wood piece in the middle)
4. staple and secure matress pad to plywood (or MDF)
(P.s. dont mind my PJ's, I hadnt brushed my hair, or applied any makeup oh and I apologize about my messy garage!! LOL)
(picture above)
5. Cut batting to have each side hanging of board by about an inch 
6. staple/attach batting on the back side
7. staple/attach linen of choice (mine needed to be ironed so badly) to the board as seen in last box on picture above.

(Picture above)
8. Nail the plywood pieces onto the board
FYI: I attached 2x4 pieces on the back one across the top one across the bottom and two on each side. Not only did it made it sturdy but i also could attach my bed frame to it. (see below)


TADA!!! 
I am so dang happy with it!! it really only cost me about $75 after all said and done.


 I am so happy with it!!! I feel like it looks like $2,000 but I only spent $75. If you have any questions please feel free to contact me! Thanks for stopping by! XOXO


Friday, April 27, 2012

That caught my PINTEREST!!

Hello my name is Tiffany and I am a pinterest addict! What did we ever do in life before pinterest? anyways here are some of my favorite this week!

Follow Me on Pinterest

Love this dress. It has a little cut out on the back! I WANT IT!!!!

I think this is absolutely stunning!

I am going to make this bed for my little dude!!

AHHH absolutely amazing!
Pinned 5 weeks ago from mango-watermelon-love.tumblr.com

YUMMY!!
Pinned 4 weeks ago from skinnytaste.com

Needed a laugh...


Thursday, April 26, 2012

Liebster Blog Award!!


"Holly guacamole" (as my 4 year old daughter would say) how fun!! I am starting to love this blogging thing so much. I RECEIVED MY FIRST REWARD!!! I was just tagged for the Liebster Blog Award from my dear friends Chelsie & Christy from http://mybest-friendsblog.blogspot.com/! They are such GORGEOUS girls and great friends and I am loving their blog. I find myself checking it out all the time :) BTW we have been working together on some GREAT blog posts to come... So ExCiTeD!! Any-who I love these two beauties so much, Thanks girls for the love back! xo.
 Go check out their blog and give them some LOVE!!


"The origins of the Liebster Blog award are somewhat unclear but the general consensus is that it originated in Germany, Liebster meaning favorite or dearest, to showcase bloggers with fewer than 200 followers. Upon accepting the award the recipient must then pass it on to five more blogs of note."

The rules are simple: 

1. Present the Liebster Blog Award to 5 blogs of 200 followers or less who you feel deserve to be noticed.
2. Show your thanks to the blogger who gave you the award by linking back to them.
3. Post the award on your blog.
4. List the bloggers you gave the award to with links to their sites. Leave a comment on their blogs to let them know they've recevied the award.
5. Share five random facts about yourself

ok lets start out with:

5 RANDOM FACTS ABOUT ME!!

1. I am a total Night owl, midnight is early for bed in my book :)
2. I pretend that I am a rock star in my car and totally belt out songs like their is no tomorrow! (i'm sure the people in the car next to me get a kick out of it)
3. I have the most AMAZING kids ever.... SOOOO lucky to be a Mommy to those little stinkers
4. I married an amazing man and we have been sweethearts since middle school! Aw how sweet!
5. I am totally freaked out by outer space... ha ha TOTALLY RANDOM!!

Man, that was a little difficult to think of random facts. Hopefully that works :)


Here are the other blogs that I think should have the liebster blog award....drum roll............

1. Pillow Thought
2. The Thingy about Joy
3. The Kinch Life
4. Suzeles says
5. Styled with life


Check them out!!! 
09 10 11 12
Blogging tips