Monday, April 30, 2012

DIY headboard


So I LOVE pottery barn and I have seen this bed on there many times! I think it is so beautiful BUT I HATE the price tag!! I just can not see myself spending $2,000 on a bed! So I decided I could make it myself. 

I did a little research and found a bed on ana-white.com (http://ana-white.com/2012/04/plans/chestwick-upholstered-headboard-queen) that I liked. Now her plan is for a queen bed and I have a king so I measured my bed frame and went off of that! Her plan also didnt have the little middle piece of wood that I wanted so I went ahead and added that on my own. I did a little tweaking but the plans worked perfectly and I was super happy with the end result.....
BTW I was so excited that the girls from http://mybest-friendsblog.blogspot.com/ came and helped me! We had such a fun time making the headboard, I think we will be making a couple more in the near future! Thanks for all your help Girls!!

ok Let me explain how I did this....


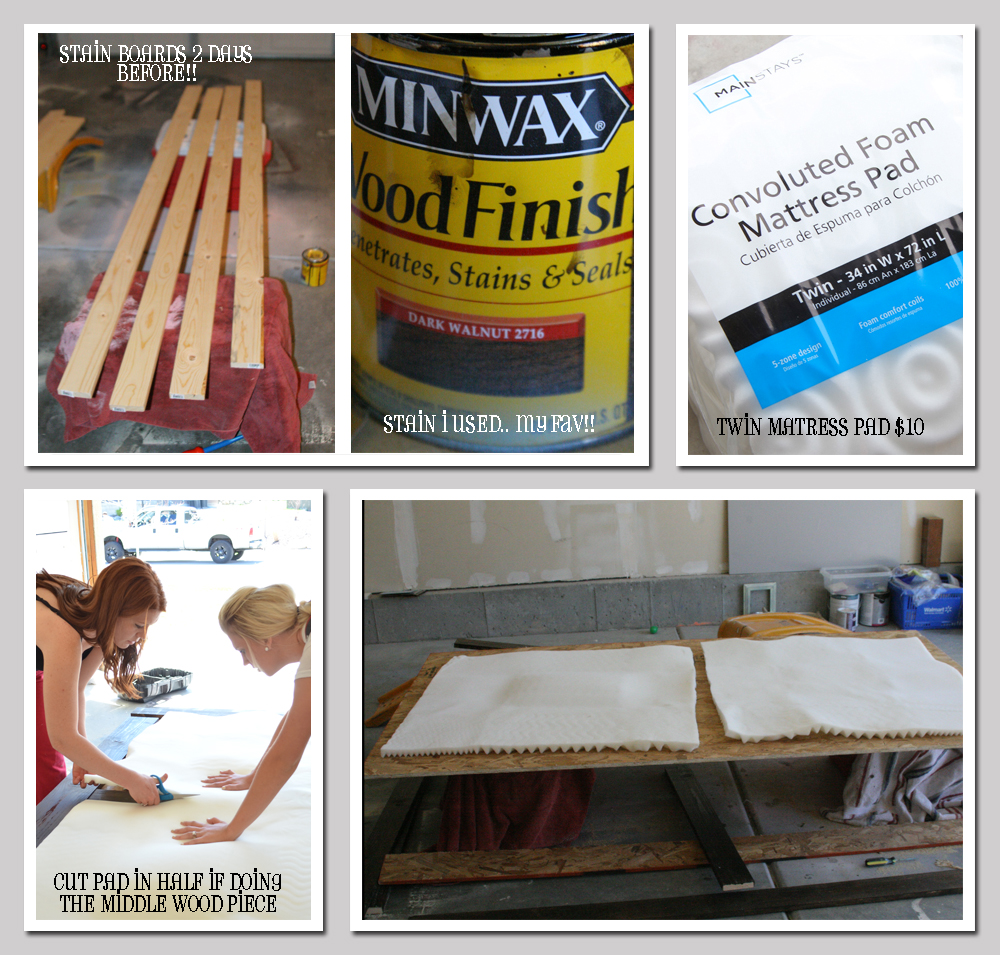
For the boards I bought pine. Had Mr. this and that cut to size (use ana's plans http://ana-white.com/2012/04/plans/chestwick-upholstered-headboard-queen or measure your bed frame and choose your height) Make sure you stain pine boards ahead of time. I did mine the night before and they were still a little wet sticky, so I would suggest doing them 2 days before.
The board I used ply wood. You can use MDF as well plywood was just cheaper.. Had the hubs cut to size. (again measure your bed frame or follow ana's plans)
For my padding for the headboard I used this mattress topper I got from Waly world (wal-mart) which was $10 CHEAP!! also got the batting their for $13.
you can use any kind of lined for the headboard, I just had an extra gray curtain laying around that would do the job and it cost me Zilch, nada, $0.......NOTHING!!! 
Step BY Step (picture above)
1. Stain boards
2.place matress pad on plywood (or MDF)
3 (optional) cut pad in half. (for the additional wood piece in the middle)
4. staple and secure matress pad to plywood (or MDF)
(P.s. dont mind my PJ's, I hadnt brushed my hair, or applied any makeup oh and I apologize about my messy garage!! LOL)
(picture above)
5. Cut batting to have each side hanging of board by about an inch 
6. staple/attach batting on the back side
7. staple/attach linen of choice (mine needed to be ironed so badly) to the board as seen in last box on picture above.

(Picture above)
8. Nail the plywood pieces onto the board
FYI: I attached 2x4 pieces on the back one across the top one across the bottom and two on each side. Not only did it made it sturdy but i also could attach my bed frame to it. (see below)


TADA!!! 
I am so dang happy with it!! it really only cost me about $75 after all said and done.


 I am so happy with it!!! I feel like it looks like $2,000 but I only spent $75. If you have any questions please feel free to contact me! Thanks for stopping by! XOXO


Friday, April 27, 2012

That caught my PINTEREST!!

Hello my name is Tiffany and I am a pinterest addict! What did we ever do in life before pinterest? anyways here are some of my favorite this week!

Follow Me on Pinterest

Love this dress. It has a little cut out on the back! I WANT IT!!!!

I think this is absolutely stunning!

I am going to make this bed for my little dude!!

AHHH absolutely amazing!
Pinned 5 weeks ago from mango-watermelon-love.tumblr.com

YUMMY!!
Pinned 4 weeks ago from skinnytaste.com

Needed a laugh...


Thursday, April 26, 2012

Liebster Blog Award!!


"Holly guacamole" (as my 4 year old daughter would say) how fun!! I am starting to love this blogging thing so much. I RECEIVED MY FIRST REWARD!!! I was just tagged for the Liebster Blog Award from my dear friends Chelsie & Christy from http://mybest-friendsblog.blogspot.com/! They are such GORGEOUS girls and great friends and I am loving their blog. I find myself checking it out all the time :) BTW we have been working together on some GREAT blog posts to come... So ExCiTeD!! Any-who I love these two beauties so much, Thanks girls for the love back! xo.
 Go check out their blog and give them some LOVE!!


"The origins of the Liebster Blog award are somewhat unclear but the general consensus is that it originated in Germany, Liebster meaning favorite or dearest, to showcase bloggers with fewer than 200 followers. Upon accepting the award the recipient must then pass it on to five more blogs of note."

The rules are simple: 

1. Present the Liebster Blog Award to 5 blogs of 200 followers or less who you feel deserve to be noticed.
2. Show your thanks to the blogger who gave you the award by linking back to them.
3. Post the award on your blog.
4. List the bloggers you gave the award to with links to their sites. Leave a comment on their blogs to let them know they've recevied the award.
5. Share five random facts about yourself

ok lets start out with:

5 RANDOM FACTS ABOUT ME!!

1. I am a total Night owl, midnight is early for bed in my book :)
2. I pretend that I am a rock star in my car and totally belt out songs like their is no tomorrow! (i'm sure the people in the car next to me get a kick out of it)
3. I have the most AMAZING kids ever.... SOOOO lucky to be a Mommy to those little stinkers
4. I married an amazing man and we have been sweethearts since middle school! Aw how sweet!
5. I am totally freaked out by outer space... ha ha TOTALLY RANDOM!!

Man, that was a little difficult to think of random facts. Hopefully that works :)


Here are the other blogs that I think should have the liebster blog award....drum roll............

1. Pillow Thought
2. The Thingy about Joy
3. The Kinch Life
4. Suzeles says
5. Styled with life


Check them out!!! 

Wednesday, April 25, 2012

FRAME and SIGN (shanty2chic inspired)

I needed a cute, fun, INEXPENSIVE frame for my room. I wanted something that would pop! So I saw this blog post from shanty2chic: http://www.shanty-2-chic.com/2011/07/cheap-but-oh-so-chic.html and decided I wanted to make it. (of coarse I added a little somethin somethin to make it my own) 
I had a piece of 1x4 wood left over from a different project. and then followed these steps
STEP 1: Size & cut (to your preference) wood at 45 degree angle. Size & Cut basebord  at a 45 degree angle ( Instead of baseboard I had a frame that was not being used so I made all my meausurments to fit the square frame.)
STEP 2: I used Liquid nails to secure each corner of the frame. I added a couple staples to make sure it was secure. I probably didn't need to, ok ok I'll be honest I was way to impatient for it to dry completely so I added the staples so I could move on and not have to wait for it to dry! :)
STEP 3: Paint frame color of choice. I used white
STEP 4: Let dry and add painters tape. I spaced it evenly apart.
STEP 5: paint your next color of choice and let dry.


STEP 6: Remove tape and sand it a little to make it look a little rustic (optional). Also on this step attach the frame or baseboard on top of the other frame. (sorry did not get a picture of that)
STEP 7: I wanted to add a little something extra so I grabbed my "bag o buttons" (from hobby lobby) and....
STEP 8: Glued buttons where I felt looked FANASTIC :) 
STEP 9: Add the claw back to hang picture

And there you have it a SUPER cute frame that cost me..... NOTHING!!! 
Everything I used was just around my house! Ahh got to love it!

Ok so along with the picture frame I wanted to have sign below that was special! I came up with this....
OK so here are the steps:
1. Get a piece of wood (i just used an old sign that I did not like anymore)
2. Paint it your color of choice and let dry.
3. write, draw, or print your saying backwards on a plain ol' piece of paper!! (I drew mine. if printed go over it with a permanent marker.)
3. put it on the piece of wood and get a paint brush a little damp. "water" paint over the saying (should barely show up)
4. paint over the light saying so you can make it stand out more.
5. sand the edges to make it look a little rustic ( I love using a nail file for this)
I wanted it to pop a little more so I used twine for the heart and painted over it with yellow. 
Aww isn't it so fun!!!


 Thanks guys for stopping by! Be sure to follow me and share this post!! I would love it SOOO much!!
Have a FANTASTIC day! 
xoxo


Tuesday, April 24, 2012

Tutorial and FREEBIE Mothers day Photoshop frame!


This is just a little something I threw together! I thought I would share just so you can get an Idea of how to use a clipping mask in Photoshop. I always wanted to know how, and maybe someone else out there does too. BTW If you want this little creation you can download it for free as well :) here we go.....
the file:
http://www8.zippyshare.com/v/59161333/file.html

1. open up the "mothers day frame" file into Photoshop

2. find your two pictures you would like to have in the  "mothers day frame"

3. select the photos and drag them into the "mothers day frame"

4. Here is the part that may be confusing but try to follow along....
ok so to put your picture into the square you Hold down Alt and Windows keys (shown in picture)

position the pointer over the line in the Layers panel dividing the base layer and the first layer above it that you want to include in the clipping mask (the pointer changes to two overlapping circles ), and click.
That should put your picture "inside the shape"
(I hope that makes sense!)

5. size the picture so you dont have any black showing

6. explained in photo :)

7. Flatten and save!

AND......
~*~voila~*~ here is mine! It is so cute framed. I will be posting that soon! I hope this helped you guys. I know that I always am wanting to learn new ways to play in Photoshop! Thanks for stopping by!


Monday, April 23, 2012

Simple fast and oh so cute!

 I love finding things around the house that I probably would have thrown away but decided to make them apart of my decor! I enjoyed this yummy bottle of wine and thought it would be ADORABLE on my shelf. I had some twine I had from another project so I got my handy CHEAPO glue gun and got started.....
I only did a glue strip straight up and down the bottle so if I needed to push some twine around to cover gaps I could. If you ran the glue all the way around the wine bottle there was no way you could cover the gaps! I think it is a cute little addition to the shelf family! 
Get creative and SHOP from home. No, not on your computer, like literally search around your home and have fun with it! :)  If you try this fun MRS. T & T challenge let me know what you did! 
Thanks for looking....
 OH HEY WAIT
if you could pretty please, I would so appreciate it if you would follow me!! I would love to do a GIVEAWAY soon just need to get more followers!! xoxoxoxo

Thursday, April 19, 2012

That caught my "PINTEREST"

Follow Me on Pinterest

Get it! That caught my PINTEREST! ha ha OK so once a week I am going to post some of my favorite Pinterest finds! so lets get started with this week shall we!

This will keep me motivated!!
(no link)

 LOVE this rug! Wish it wasn't so expensive!! She has AMAZING rugs on her site!

 Such a cute summer outfit! Love the Lace top with the jean jacket!

Ahh I freaking LOVE the yellow and gray! Love how they mixed all the patterns yet kept it clean and simple! Cute cozy room!

I want this amazing drumshade!! I absolutely love the pattern, couldn't you tell from my dining room wall? shown here: (http://mrsthisandthat.blogspot.com/2012/04/dining-room-wall.html) The only problem with this light  is... THE PRICE TAG!! This sucker is $973. Looks like I might be doing a DIY drumshade light. We shall see :)
Im loving chevron.. umm who isnt? It is a great center piece of the room! 
 I love this idea, in fact it is one of my DIY projects in the near future with a couple tweaks!! So fun!


Well there was a few from today! What caught your "pinterest"? I will post more next week! 


09 10 11 12
Blogging tips